Heya
So just little up not much tho. When you are modeling a car/phone anything you probably run in to a lot of problems with innacurate blueprints. Its because the person who made it either didnt got them perfectly accurate or thy just bad. Easy sollution is to get blueprints directly from card supplier.
Heres few tips on to how to do it:
1. Find Media Center for specific car manufacture. Usually just type BMW media centre/uk/us general or something like that. Mitsubishi usually provide blueprints there.
2. Register, and go thought their service. It depends but most of the time its free/fast and you can gain access to huge database of reference photose/etc/etc
3. Look for blueprints. They usually there, in a great Illustrator format - there is nothing better than 10k image in max for blueprints.
4. If you cant find it there, look for ''pay'' section if one exist.
5. If all fail, just send them an email, they might be nice enough to provide u with one set of blueprints.
And thats all, if it fails just go to these websites they usually got all blueprints u ever need:
http://www.the-blueprints.com/
http://www.smcars.net/
http://www.suurland.com/
Good luck
Cya, Dariusz
Monday, 22 March 2010
Sunday, 21 March 2010
Misc - Study of Sun
Heya
I was surfing the net the other day and I came across some good vid that could help newbies in 3Ds Max. Its made by two home mates.
What they did is took vid of sunrises for 30 days in September. Thanks to that we can see how does atmosphere and sky work and react with sun. Notice how the colour changes and blend when sun its waking up. Pretty great piece of work to study and then try to fake in 3Ds Max. Few effects that are coming to my mind when I'm watching it is to recreate dusty/dirty camera lens to get that highlights ''artefact's'' which we can see. The other thing is to get that atmosphere and clouds. Its great example to learn on to how animate clouds and how they react with atmosphere. On one of the clips we can see beach and clouds over the water. Funny how does they go up just around the beach area and disappear(1.10-1.20min +/-).
Thanx for reading.
Cya, Dariusz
Friday, 19 March 2010
3Ds Max - General Max Tips - Project folder in production and file archive
Heya
So in this little post I'll go through project folder for 3ds max. When working as a freelancer or team player it is important to have clear layout of your work so that anyone can read it and use.
But in first place what is a project folder?
Well basically it's your folder index list. You will have there all folders that you would need to use in your work. For example Maps for textures, Autobacs, Scenes etc.
The max itself got a project folder system which covers probably every aspect that you would ever need. All you have to do is go to Max Icon (top left) or File>Manage>Set Project Folder
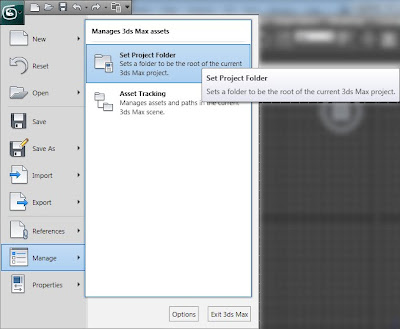
Then just pick up the location, in my case just an example folder.
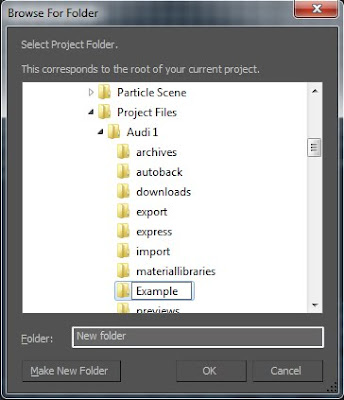
Once you click OK, max will create your folder list that will looks like the one below.
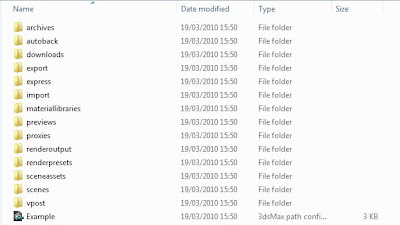
Once you do that you can just rar/zip up this folder and send to any one that it's going to work on your project. He will have all the data he need to work and there should be no errors/render server's problems will pop up.
This is one method, the other one is a bit different and custom. This time instead of using max project Manage we will just make our folders manually. Basically create all folders that you would need, for example: Scenes, Maps, Refs, Proxy. It's like I said a bit more custom approach but for some small projects it will work just fine.

Now that you have your custom project folder it's time to go through archiving it and getting all link paths in right place. Most of the time when we are working on projects we don't really have the time to copy/past all the textures and files from assets folder to our project folder. Once we finish our scene we will usually get some files in our project folder for example, scenes in scene, proxy in right spot, x ref and maybe few others but when it comes to textures and HDRI's they usually are scatter all over your hard drive. So easy and fast method to fix it is to use Max Archive tool. It's located in Edit/Left upper Max icon>Save As>Archive/ or just at the bottom in old 2009> edition.
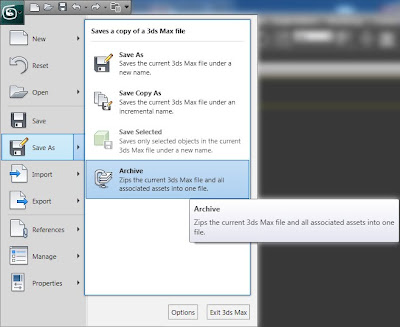
Once you click on it max will ask you where to save it.
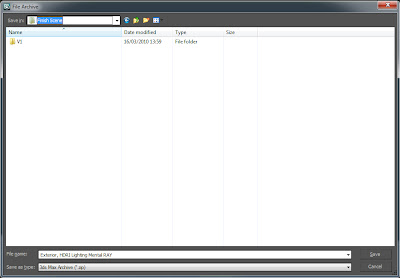
Give Max few mins to save it, it depends on how many maps, proxy etc you have in your scene.
Once it's done go to your explorer where you have saved the archive and use Rar/Zip/anything else to unpack it to the folder. In some cases Rar will pop up with an error just like the one below.
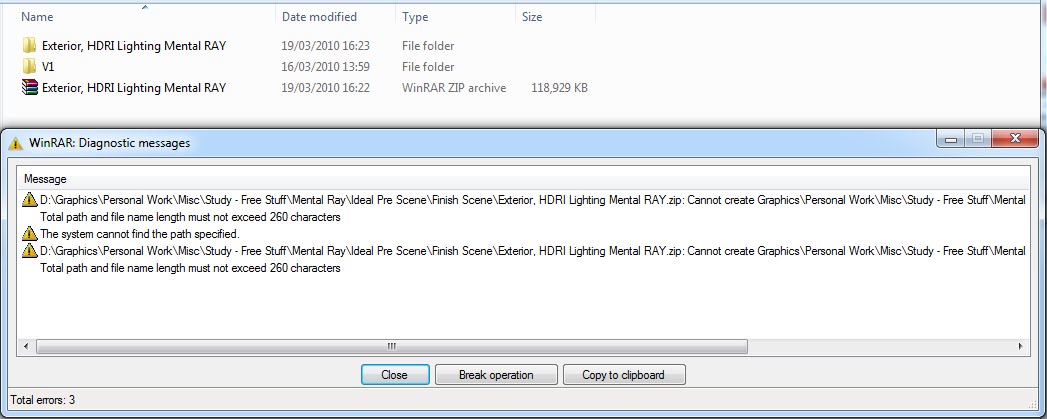
Don't worry, all we have to do it to open rar file, select all folders inside it and drag them to the folder that rar has created. It will ask to override some files, fell free to do it.
The next part it's to take all the maps and other files that were scatter on your hdd from that archive folder to your custom project folder or the max one. So simplest way to do it is to open one folder with your project, and one with rar archive. Then just drag maps and textures from rar to project folder.
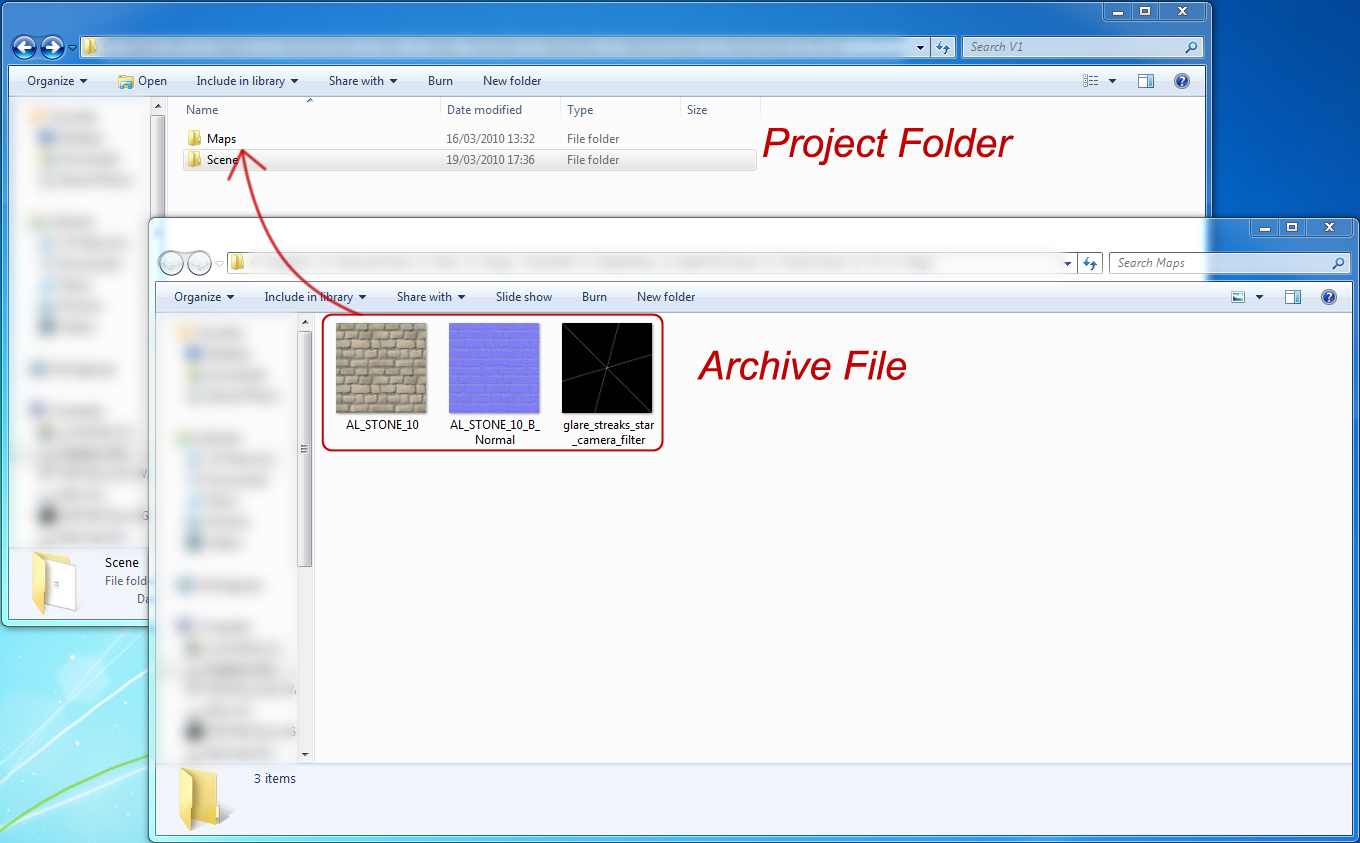
Once we do that, we have everything cleaned out. All maps are in right place, same with proxy and other objects if something was also missing.
The next step now is to get max to fix the file path so he is looking for the files in our project folder and not over hard drive. So what we have to do is to open our max with the scene, and go to Edit (or max icon) > Manage > Asset Tracking (or just asset tracking in old max)
Now once we click on it well se Asset Tracking window menu. In there all we have to do is to select all our Maps/Assets>Right Click>Set Path> and pick our Folder. Be careful because it also includes proxy if I'm not wrong and other files. Once you do that you should be able to have status ''Found'' if no then just right click again and pick ''Make Path Relative to Project Folder''. This usually fixes it.
We are almost finishing, the only one last thing we have to do is to simply double check the maps with another map tool maps Manage. It's located in Utilities section on the right under the hammer icon. Press More>Bitmap/Photometric Paths from the Utilities list and click OK (I have added it to my list since its used quite a lot). Then select Include Material Editor, Include Material Library and press Edit Resources....
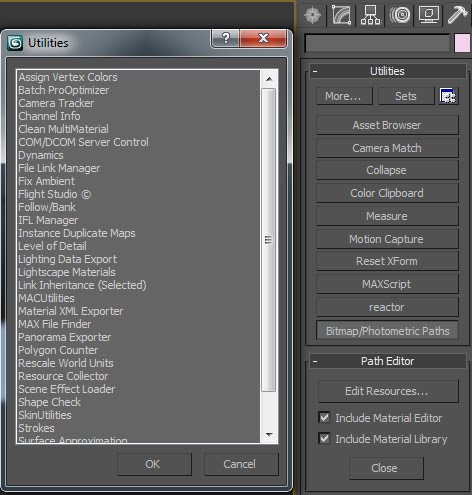
The new menu will have only maps in its list. Select them all and press Find Files. It will scan them all and give us result if he could find all mats or none. Unfortunately it won't list which maps were not found so we have to find it manually. U can use either of these tools, but from what I have notice the Asset Tracking works faster for big scenes.
And that all thanx for reading.
Cya, Dariusz
Tuesday, 16 March 2010
3Ds Max - Preparing Max for work! - Gamma and Units
Heya
so let's get started shall we?
In order to work in max we have to prepare it to work. So there is no unwanted surprise once we start our work.
so let's get started shall we?
In order to work in max we have to prepare it to work. So there is no unwanted surprise once we start our work.
1. Unit Scale
Every time you start your project you have to think about units. If it's big model: City, Exterior Arch. You might want to use meters, for interiors maybe CM and for micro even millimetres. It's all connected to your render, photon samples sizes, lights everything. So it's a bit crucial to keep it in right form from the beginning.
Now where are these little scale thing?
Customize> Units Setup
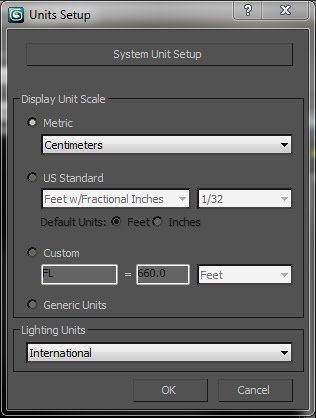
Hohohoo that not all! Now you have to go to System Unit Setup and set it all again to match these settings.
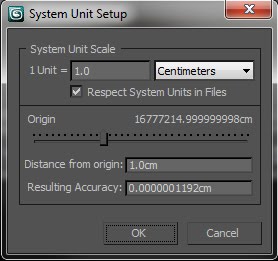
Now you set to go with units!
Now you set to go with units!
Now it's time for GAMA
2. Gama and Lut
Gama and lut it's how you monitor/screen is showing you images. Old CRT had gamma 1.0 therefore you didn't had to change it. But the new LCD monitors are running 2.2 so we gonna have to change our max settings too to match our LCD screen. Also another benefit from gamma 2.2 is that you can use less light to light your scene since it's much brighter = less render time.
Customise>Preference>Gamma and Lut (it's just in the middle of the pop-up window
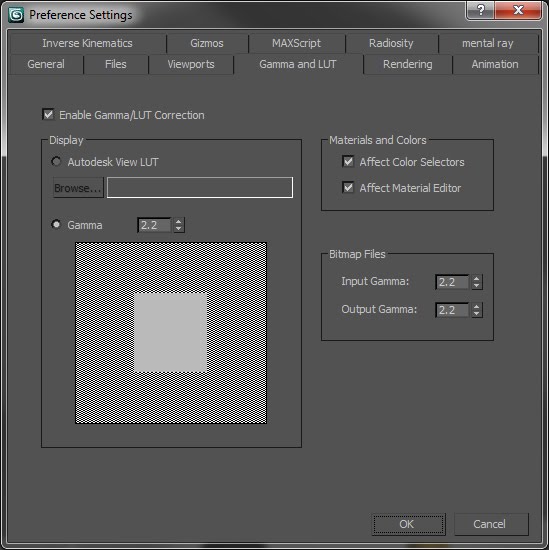
Now I set also gamma of Bitmap Files to run at 2.2 but you might consider it to leave at 1.0. Also if you look at this screen shoot from above the white/gray rectangle will have different colours than you're in max. I don't know why but SS changed its colours.
And that it for Basic scene set up. Once you got this bit you can just go crazy with your models and renders and have fun!
Cya, Dariusz
Subscribe to:
Comments (Atom)
